Turning an ordinary bathroom into a wet room can transform everyday bathing into a luxurious experience. Depending on the fixtures, fittings and accessories you choose it is not difficult to create the effect of a luxury spa within your own home because there are now products readily available to help you make the transformation.
Updated July 2018
Contents
- What is a Wet Room?
- Preparation for Creating a Wet Room in Your Own Home
- Get Your Floor Level Right
- Choose your Waterproofing Material
- Install the former (flush shower tray)
- Selecting the Right Tiles
- Choosing the Correct Adhesive & Grout
- Waterproofing Methods
- Wet Room Walls
- Wet Room Floor
- Tiling
- Adhesive
- Tile Grout
- Wet Room Shower Tray
- Wet Room Drainage
- Underfloor Heating
- Other Considerations
Wet rooms are no longer seen as a luxury and are becoming more and more popular in ordinary homes because of technical improvements in waterproofing methods, tiling products and shower accessories.
Shower designs are becoming ever more sophisticated and people expect a more luxurious showering experience than would have been typical even just a few years ago. Over recent years our expectations in terms of stylish and luxurious bathrooms in our homes have changed. We are more design-conscious and expect a higher level of sophistication for our bathing experience. As technology has improved in line with these expectations wet rooms are increasing in popularity even in the smallest of homes. So if you are planning to install something special our guide to creating a wet room should provide everything you need to get started.
What is a Wet Room?
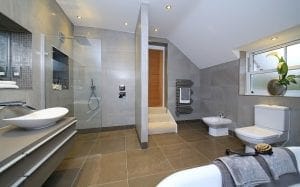
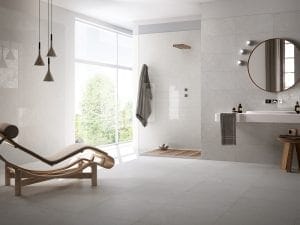
A wet room is a completely waterproof room with an open showering area on a tiled floor rather than an enclosed shower cubicle with a raised shower tray. They often have a frameless glass screen along one side for practical reasons to keep the water within the shower area but will still have a level walk-in shower area. A waterproof wet room is not the same as a fully tiled bathroom using waterproof grout, but similar to the tanking techniques that are used when converting basements. Waterproofing the different surfaces and parts of a bathroom requires a different approach so you will need to be aware of the various waterproofing methods and also understand the sorts of problems that can arise and the areas most prone to leakage. Before reading further in our guide to creating a wet room carefully consider the advantages and disadvantages of this type of installation, the first steps to creating a wet room and our additional advice and tips for wet rooms.
Pros and Cons
3 advantages of a wet room are:
- Contemporary and stylish
- Can add value of your home when there is a second bathroom
- Easy to clean and keep looking good
3 disadvantages of a wet room are:
- Towels etc. can get wet from the shower spray
- Expensive to waterproof properly
- Removable of a bath may make home less saleable if only one bathroom
Preparation for Creating a Wet Room in Your Own Home
Let’s start with the basic tasks required to prepare the room before creating a wet room:
- First ensure that all of your wall surfaces are sound – fill holes, repair or replace plaster if necessary and remove any old wallpaper, tiles, grout or adhesive.
- Plan the positions of your shower area and other bathroom fittings, paying particular attention to the planned location of the floor drain so that water will drain away quickly.
- If you have floorboards make sure they are all secure – screwing them down where necessary.
- If you have a concrete screed floor this will have to be channeled out for the underfloor heating pipes and also to enable a flush shower tray former to be installed.
Once the walls and floor are prepared you will need to waterproof them using the method most suited to your substrate.
Get Your Floor Level Right
 If you are building a new home then it is relatively easy to create the right floor levels for a wet room but when adapting an existing bathroom it is not so straightforward if you want level access to your showering area. If your room is on the ground floor and you have a concrete screed surface you may be able to channel out an area for the shower former (the flush tray that enables easy laying of tiles at the correct gradient for good drainage) or you may be able to raise the surrounding level with another layer of concrete screed, but bear in mind door openings and whether this will create an awkward step up at the entrance door.
If you want the floor level to be the same as that outside the wet room then this will require lowering the floor level so that by the time the waterproofing layer, adhesive and tiles are laid then the level will be correct.
On upper floors where there might be a wooden floor it may be possible to support the shower former on the joists but this is very dependent on each particular installation as the size, direction and positioning of the joists will all influence what can be done. In many cases with installations on upper floors in existing houses the only option is to raise the floor level either just around the shower area or in the whole room.
Whatever method is chosen for the floor level, it is essential to ensure that the tiled floor surface is the correct angle for good drainage.
Choose your Waterproofing Material
There are essentially 2 main options as a waterproofing material: a membrane or a viscous product that is applied with a roller. A waterproof membrane is glued to the substrate in panels that butt up against each other (but do not overlap) and the joints between each panel are sealed with waterproof tape.
The second option is to paint on a waterproofing product with a roller which creates a continuous barrier without any gaps. The type of product to use is dependent on the absorbency of the surface to which it is being applied.
Whether you use a membrane or a waterproofing product all of the joints between walls and floor and any other joints such as around boxed in pipes etc. will have to be sealed with waterproof tape before the surfaces are ready to be tiled.
Install the former (flush shower tray)
A wet room former is a flush, concealed tray that is tiled over and ensures that the correct slope for good drainage can be easily achieved. A slope to the drain can be created manually but it is more difficult to obtain the perfectly smooth and correct slope when done this way. Formers are available in a variety of regular shapes and sizes but there are also companies that will make them to your own specific shape and size.
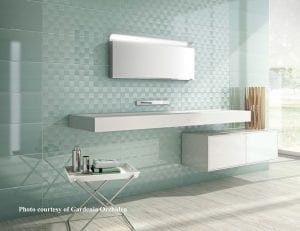
Selecting the Right Tiles
 It is much easier to produce a good sloping finish, and one that does its job well in successfully draining away water, with small tiles. They can be ceramic tiles, porcelain tiles or natural stone tiles but the smaller they are the better, which is why mosaics are such a popular choice for wet room showering areas. But it is not necessary to tile the whole wetroom with small tiles, just the shower area where the sloping floor is.
For the rest of the room you can choose complementary tiles – even very large porcelain tiles, but remember that the floor tiles should have a high anti-slip rating to make the area safe to use.
Also be aware that some natural stone tiles, like limestone, slate or marble are porous so need to be sealed before use to avoid water damage; and resealed periodically afterwards to maintain them properly.
Choosing the Correct Adhesive & Grout
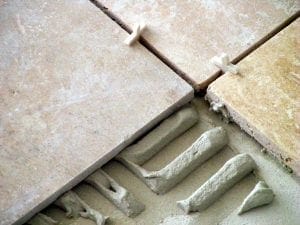 A flexible adhesive is always the best choice for a wet room as it offers protection from the movement that is likely to occur over time and could cause tiles to crack if they were installed with a non-flexible adhesive. There are many different types to choose from and your tile supplier can offer the best advice. Most are suitable for all types of natural stone, porcelain and ceramic tiles but if you have particularly porous stone tiles (like certain limestones) always check the suitability of the adhesive.
It is obvious, but still worth mentioning that some grouts are not waterproof so ensure you select one that is suitable for a wet room and also select one that has an anti-fungicidal treatment if you want its good looks to last. As with adhesives, most grouts are suitable for all types of tiles.
Waterproofing Methods
Once the former is in place the whole room, floors and walls, needs to be waterproofed before the tiles are fixed in place. Making sure the room is completely water tight is the most essential part of installing any wet room. Tiles with waterproof grout are not adequate enough for a shower area without a tray or a surround so never skimp on the waterproofing step.
The best way to create a fully water tight area is to use a waterproofing product that creates a barrier between the tiles and the floor or walls. There are 2 options for doing this:
- Lay a waterproof membrane, which is glued to the surface in non-overlapping panels with the joins between the panels then sealed with waterproof tape. The disadvantage of this type of waterproofing is that there is the potential for leakage if the waterproof panels shift over time to expose the joins.
- Apply a waterproofing chemical product (many of which are environmentally-friendly, mineral-based products) which eliminates any concern about water leaking through gaps as it is applied in a single, continuous coat using a roller or spreader to any type of surface. Different products are available depending on the absorbency of the underlying substrate.
Whatever type of waterproofing you choose it will then be necessary to apply waterproof tape to all the wall-floor joints and corners before the substrate is ready for tiling.
Wet Room Walls
Rendered walls are suited to a number of different waterproofing techniques. Specialist waterproof matting can be fixed to the walls or a waterproof coating can be applied directly to sound render, or tile backer boards can be fitted on top of the rendered surface.
If your walls are stud partitions walls, plasterboard, plywood, plaster, brick or blockwork then you will have to attach tile backer boards, which are usually 10mm – 12.5 mm thick. Tile backer boards are limited to a maximum weight of tile plus adhesive so this will affect your choice of tile. Check with both your board and tile supplier to make sure you have a board that will support your preferred tiles.
If the substrate is new plywood it must have been allowed to acclimatise to the environment for at least 24 hours before beginning the waterproofing process.
Each tile backer board must be sealed around the edges with silicone sealant before fixing the next board. Once all boards are fixed, cover all the joints with polyester tape and then skim with a cement based tile adhesive. Where there are gaps due to pipes, drains and shower fittings also use silicone sealant covered with polyester tape to seal the gaps; these are the places most likely to cause a leak in your wet room so pay particular attention to waterproofing them fully.
Wet Room Floor
As with walls for a wet room, the floor needs to be waterproofed in different ways depending on the type of floor. Before beginning the waterproofing process double check the location and fitting of your shower and drain. When replacing a traditional bathroom with a wet room you will need to ensure that the finished floor height is where you expected it to be. The floor tile thickness, adhesive, tile backer board and waterproof matting will all contribute to raise the floor level so if you want it to be at the same level as outside the room then you may need to lower the floor before work begins.
Your bathroom floor is most likely to be concrete screed or floorboards. If you have floorboards then check that they are clean, dry and firm – screw down any that are loose. Stick a waterproof membrane to the floor with a flexible thin-bed adhesive. Then seal all the joints with polyester tape, paying particular attention to corners and the areas around protruding pipes. Floor tiles can be laid directly onto the waterproof membrane.
A tile backer board serves the same purpose as a waterproof membrane – it is fully waterproof and is more suitable for uneven floors with gaps or cracks so is more commonly used when creating a wet room from an existing bathroom in an old property. It is glued to the floor with a tile adhesive and additionally screwed in place if the substrate is a timber floor.
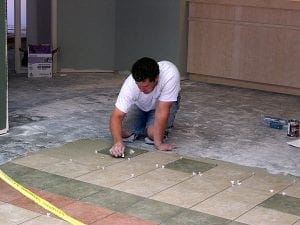
Tiling
Any type of water resistant tiling is suitable for a wetroom but bear in mind that very large porcelain tiles might be difficult to cut to the required angle in order to create the correct slope towards the drain. The smaller the tile the easier it is to create the correct gradient; also small tiles, with their proportionally larger areas of grouting, will usually be more slip-resistant than large porcelain tiles.
For this reason mosaic tiles or small tiles tend to be more popular for the showering area of the wet room. For the design-conscious, large porcelain tiles can be used in the main part of the room and on the walls with complementary mosaics in the shower area.
Adhesive
Use a flexible adhesive to ensure surface stability if there is any movement in the floor over time and an anti-fungicidal, waterproof grout to install the tiles and finally seal all wall-floor joints with a silicone sealant. Most adhesives and grouts are suitable for all types of tiles but if you have some very delicate natural stone check with the supplier for advice as some are susceptible to staining from certain types of adhesive and grout.
Tile Grout
Clearly getting the waterproofing of the walls and floor right is critical to the success of your new wet room but there are also some other important aspects to consider.
One of these is the choice of grout – not all grout is waterproof so you will have to choose a polymer modified grout (there are a number of different makes on the market). But water resistance is not the only feature of a grout that is important – with many power showers now generating very forceful jets of water, the grout has to also be able to withstand a daily battering from strong blasts of water. If you are in any doubt about the type of grout to use then call us or email us for advice.
Wet Room Shower Tray
Another important part of the wet room is the shower tray – a wet room shower tray is usually installed so that it is level with the tiled floor surface. This can be achieved in 2 different ways:
- Lay the shower tray on top of the existing concrete or wooden floor and then raise the surrounding floor levels using waterproof tile backer boards. The only potential problem with this is that the wet room floor level may not be the same level as the floor of the room or hallway immediately outside. This will require the wet room door to open outwards and there will then be a step up at the entrance.
- Cut into the existing floor so the shower tray can be set in to be level with the existing floor. Depending on the floor type, the tray may need to be supported from underneath.
Another alternative is to create a stepped area around the shower tray only. When done well this can become an attractive design feature of your wet room.
Wet room shower trays are preformed with the correct slope towards the drain to ensure water always drain quickly even from the most powerful of showers. They can even be cut to suit awkward spaces and the floor tiles can be laid directly onto the shower tray without any additional preparation. The advantage of using a wet room shower tray is to avoid having to calculate and prepare the correct slope for good drainage.
Wet Room Drainage
The drain itself needs to be carefully chosen as the most suitable type will depend on the depth available beneath the floor. Some drains have a shallow profile where floor depths are limited but if the installation area is not limited by floor depth (in a newly built room, for example) then a fully vertical drain outlet will offer better, quicker drainage of water.
Some shallow drainage traps can be installed in a space with a depth of only 70 mm yet still produce flow rate of 0.8 litres/second which is double the flow rate required by the European Standard EN 274.
Underfloor Heating
Underfloor heating is a necessary luxury in a wet room – not only does it make the floor a pleasant temperature to walk on in all weathers but it also helps to quickly dry the tiles and avoiding a slippery floor.
There are two different types of underfloor heating: electric heating, which uses cables or a mat, laid directly on top of the waterproof membrane or a system of pipes that works off the main central heating system.
Electric underfloor heating is usually easiest to install in an old house because it is easy to install over an existing floor and requires a thermostat and timer to control the heat. The disadvantage is that it can be expensive to run.
A central underfloor heating system uses pipes containing hot water in the same way as radiators work so it is easier to control and less expensive to run (off gas or oil) but is more difficult to install in an existing room as the pipes need to be installed under the floor. It is better suited to a newly built wet room.
Other Considerations
If your wet room is small then you will have to consider carefully the other elements of the room apart from the shower area as the room will often be wet. So, for instance anything such as lights over the basin need to conform to the regulations concerning the areas in which they can be installed.
If you have a countertop basin the surface on which it sits must be fully waterproof so a typical wood or laminate surface will not be adequate. Some natural stone will be suitable but you also have to think about whether you will have cupboards underneath and, if so, what material they are to be made from. The same applies to bathroom cabinets that will be in the splash zone. This is where a simple frameless glass screen may help reduce splashes on parts of the bathroom that may need addition protection. Remember the room may be waterproof but you do need to think about the content of the room