When you’re doing some DIY tiling you will have some challenges to overcome in the way of difficult tiling jobs like cutting circles or working around sockets. Here are some tips to help you.
When you’re tiling, it is likely you’re going to come across a few different challenges that can seem difficult if you’re new to tiling. Don’t fret – with these fiddly bits, take your time, do your research, plan well and you should be able to achieve great results.
Plug Sockets & Light Switches
Make sure you lay tiles as close to the socket or switch as possible. To ensure the job looks polished at the end you should try and insert the tile slightly behind the switch or socket if possible, but only if doing this ensures the socket or switch is securely pressed onto the tile – so no water drips or dirt can get in between the gap. If you do this make sure the power is turned off for your safety. Then loosen the switch or socket so you can slot in the tile and adhesive. Use a piece of card to help you measure out tiles to fit. Fixing tiles this way is much easier than cutting tiles to fit around the socket or switch.
Cutting Curves Or Circular Shapes Out Of Tile
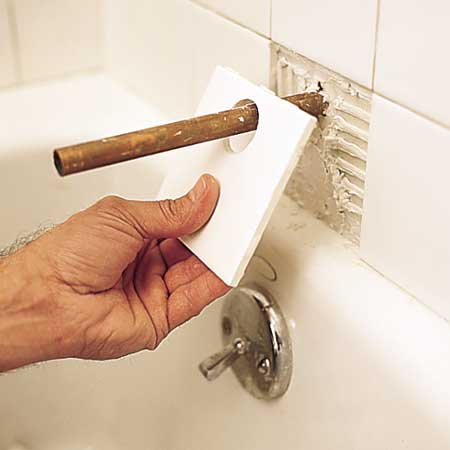
The very first thing you need to do is make a cardboard template that matches the tile size. Use thin card as this is more easily shaped. Cut out the shape you need from the card, stick this onto the tile using blu tack so it doesn’t move, then cut around it. Alternatively, draw a mark around the template onto the tile, just make sure to use non-permanent marker!
Windows & Doors
Windows and doors can be difficult to tile around. The easiest way to deal with this issue is to work from the centre of the door or window. So if the wall contains one window or door, start working from it’s centre line. With two windows, work from the centre of the space between. If the window or door is more towards one side of a wall, work from the centre of the largest space between its frame and the corner.
Broken Tiles
Unfortunately the smallest bit of damage to one tile can ruin the overall look of the entire wall, or even room in some instances. But this can be resolved without completely redoing the entire surface. You will find it’s very tricky to remove the damaged tile without damaging any of the surrounding wall tiles or floor tiles. If you’re lucky, the tile will come away easily.
- Use the correct safety equipment when working with tiles. You’ll want eye protection, dust protection and hand protection.
- Use a grout remover to get rid of the grout around the edges of the tile that is damaged.
- Using a ceramic drill bit – drill holes into the middle of the broken tile. This will weaken the tile.
- Using a hammer and chisel, carefully chisel between each drill hole, slicing away the tile in chunks. Be very careful not to go into the wall when doing this.
- Once you’ve removed all of the damaged tile, scrape out the adhesive taking care to remove as much of it as possible. If you don’t take enough adhesive out you will find the new tile you place sticks out away from the other tiles.
- Cover the back of the new tile with adhesive and insert it into the hole.
- Press the tile down to ensure it is level with the other tiles.
- Add tile spacers to keep the tile in place and leave room for grouting.
- When the adhesive has dried completely (don’t rush it!), take the spacers out and grout, allowing the grout to completely dry before the wall is used again.